ART CONSERVATOR
DIGITAL
A PUBLICATION OF THE WILLIAMSTOWN + ATLANTA ART CONSERVATION CENTER
VOLUME 15. NO.2 THROUGH ROSE
colored GLASSES
Through Rose Colored Glasses | Workshop on Recreating early 18th Century Red Lake Pigments
RACHEL CHILDERS | POST GRADUATE FELLOW IN PAINTINGS CONSERVATION
Rosy cheeks, pink lips, red coats, and apocalyptic skies. These have become hallmarks of a collection of twenty-six early 18th century Hudson Valley Limner paintings of noble Dutch patroons and their kin. Little is known about the artists who created these portraits, but through an ongoing conservation treatment campaign and technical study of this collection of early colonial treasures owned by the Albany Institute of History and Art (AIHA), we have been able to shed some light on the artists’ techniques and materials.
My research into the collection focuses specifically on the artists’ use of the dye-based pigment known as ‘red lake’. After the initial examination of the paintings in both visible light and ultraviolet induced-visible fluorescence, it became clear early on that nearly every painting contained red lake. The way in which the pigment was used varied not only amongst the artists, but throughout a single painting. An example of this can be seen in a painting attributed to Nehemiah Partridge entitled Portrait of Gerritt Teunis van Vechten (c. 1719) (fig. 1). The red lake medium was best identified through a technique called ‘cross section analysis’ whereby a small sample (roughly the width of four human hairs) is taken from an area of loss in the painting, mounted in an epoxy, then ground and polished along the side to reveal the stratigraphy of the paint layers, similar to cutting into a piece of cake. In the first sample taken from the menacing red sky, a thin layer of medium-rich red lake was applied over a deep red ground (fig. 2a). This use of the lake pigment allowed for the transparency of the red lake to intensify the opaque ground resulting in a vibrant scarlet hue. The second sample taken from the sitter’s rosy cheek revealed the artists use of red lake in combination with lead white to create a pale pink (fig. 2b). This was liberally applied over the red ground creating an opaque rosy skin tone.
This varied use of red lakes was seen throughout the series of portraits. The lake was used as a glaze in the skies to create a rich background, mixed with lead white to create a rouge in the sitter’s faces, and mixed with the red mercury-based pigment called ‘vermillion’ to make the striking crimson costumes and accessories. In addition to exploring the artists’ use of lakes, my goal has been to identify and characterize the source of the dyestuff through scientific analysis and workshops that focus on recreating the lake pigments from historic recipes. This technical bulletin addresses the latter, shedding light on the process used to create such a vibrant and versatile shade a red.

FIGURE 1. After treatment image of Nehemiah Partridge’s Portrait of Gerritt Teunis van Vechten. The markers indicate the location of the samples in figure 2.
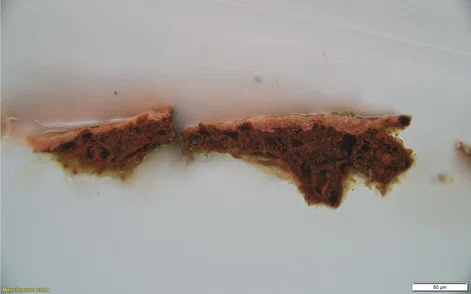
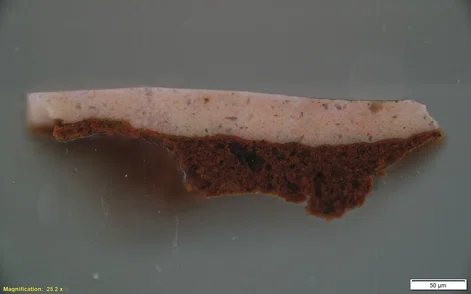
FIGURE 2a (Top) and 2b (Bottom). The sampling locations are indicated by arrows on the left. Figure 2a shows medium-rich red lake was thinly applied over the red ground. Figure 2b shows that red lake was mixed with lead white in order to create the flesh tone, then applied liberally over the red ground.
This varied use of red lakes was seen throughout the series of portraits. The lake was used as a glaze in the skies to create a rich background, mixed with lead white to create a rouge in the sitter’s faces, and mixed with the red mercury-based pigment called ‘vermillion’ to make the striking crimson costumes and accessories. In addition to exploring the artists’ use of lakes, my goal has been to identify and characterize the source of the dyestuff through scientific analysis and workshops that focus on recreating the lake pigments from historic recipes. This technical bulletin addresses the latter, shedding light on the process used to create such a vibrant and versatile shade a red.
SOURCES of red lake dyes
Up until the 19th century, red lake pigments were extracted from natural sources including plant species, insects, and mollusks [1]. While these might sound like strange sources for color, humans have been harvesting organic materials for artistic use since the ice age. Prior to the Dutch colonization of what is now the Hudson Valley, the Mohawk people had use catlinite and hematite to create red ornaments and vessels [2]. After the Dutch settlers arrived, trade expanded in South America and extended to the Mediterranean, allowing artists to broaden their palette and explore new pigments. For our study, we decided to focus on three main red lake natural dye sources imported into New York during the early 18th century; cochineal, madder, and brazilwood.
Cochineal
Growing up in southwestern Arizona, I became all too accustomed to the white webbing that sprung up on the paddles of the prickly pear cactus over the hot summer months. As a child, I never had any desire to unearth whatever creature made that their home, but as a postgraduate fellow studying red lakes, I was eager to research this curious bug. Cochineal is a small, scale insect that feeds on the nutrients of the prickly pear (figs. 3-4). It spins the white webbing in order to protect itself from the intense desert sun, and as a defense mechanism against other insects, it produces carminic acid, from which the red dyestuff is derived. Cochineal is native to South America and parts of the American southwest. While today Peru serves as the main source for the insect, in the early 18th century Americas, Mexico had exported it both north to the New World and across the Atlantic to Spain after the colonization of Mexico by the Spanish [3]. Cochineal was in high demand by the British Army during this time, as the colorant extracted from the insects was used to dye the red coats of their military uniform [4].

FIGURE 3. The sampling Cochineal bugs on a prickly pear cactus during harvesting.
Madder
The colorant madder, also known as ‘rose madder’, ‘Turkey red’ or ‘dyer’s madder’ depending on the manufacture process, is native to the Middle East and eastern Mediterranean (figs. 5-6) [5]. The dyestuff is obtained by harvesting the root of the plant species Rubia tinctorum after two years of cultivation. Madder differs from other dyestuff in that it can produce a wide range of hues ranging from orange to burgundy depending on the pH and temperatures of the dye bath during extraction. Due to it being a plant structure, the root material is a complex mixture of several components, the most important for creating a dye are pseudopurpurin, purpurin, and the acid ruberthyrin [6]. Compared to cochineal, extracting a dye from madder is fairly simple. However, similarly to cochineal, the dye is light sensitive.

FIGURE 4. Dried Cochineal bugs

FIGURE 5. Ground madder root

FIGURE 6. Illustration of Rubia tinctorum, or the Rose Madder plant. Franz Eugen Köhler, Köhler's Medizinal-Pflanzen, Public domain, via Wikimedia Commons.
Brazilwood
Beginning as early as the 12th century, wood from tropical trees were boiled to extract a rich orange-red dye for textiles. The main ingredient of the dyestuff was the hydroxyanthraquinone Brasilin, which is present in several tropical wood species including brazilwood and sappanwood [7]. While the extraction of brasilin produces a colorless substance, it becomes a deep red-brown upon oxidation. When mordanted using chalk, the dyestuff turns cherry red, and when mixed with alum a deep purple is created. The use of the pigment as a textile dye and pigment for works of art is limited as it is lightfast and fades when heated. Brazilwood is native to the Brazilian Atlantic forest, though due to mass deforestation it is now an endangered species. For the purposes of this study, a similarly related plant species called sappanwood was used as a replacement (fig. 7).
FIGURE 7. Ground brazilwood
RED LAKE WORKSHOP
Similar to cooking in the kitchen, some red lake recipes proved to be more challenging than others. Each recipe requires monitoring temperatures to ensure the solutions stay within a certain range, some ingredients were measured to the hundredth of a decimal place, and filtration processes lasted for days, if not weeks. With the help of two pre-program interns who participated in the workshop, Leila Reid and Jonah Jablons, we were successfully able to create over fifteen historic red lake recipes [8-10].
Obtaining Ingredients
Much like the Dutch settlers, we had to rely on the import of the ingredients from both domestic and foreign companies in order to create the red lakes. All three natural sources were found through websites selling natural dyes for yarns and cloths. As an added bonus to the workshop, myself along with Leila and Jonah were able to harvest live cochineal bugs from a prickly pear cactus paddle (fig. 8). Last October, just before the insects went into hibernation, my parents walked into their backyard in Tucson, Arizona, cut off a paddle chalk full of cochineal, and mailed it to the WACC. In the timelapse video below, you can see the process of carefully uncovering one of the rather plump female cochineal insects that had firmly attach itself to the side of a prickly pear paddle. The sticky spiderweb-like material was carefully removed, and the female plucked from the cactus. The insects were then placed in a temperature and RH controlled oven in the Analytical Lab to be fully desiccated.
FIGURE 8. This video demonstrates the careful process used to remove female cochineal insects from a prickly pear cactus paddle
Creating the Dye Solutions
While the steps involved in extracting the dyestuff from the natural sources is seemingly quite simple, each recipe had slight alterations to either the temperature range, order of ingredients added, or ratio of ingredients. In general, the process to extract the colorant and create the dye solutions were as follows:
1. The natural sources were either cut into small pieces or ground using a mortar and pestle.
2. The material was wrapped in cheesecloth, gently washed to remove any dirt, then placed in a beaker full of water and kept at elevated temperatures for a period of time to extract the dyestuff.
3. The remnants of the natural source materials are then removed and the dyed solution is filtered to further removed any impurities.
4. In order to precipitate the dyestuff that’s suspended in the aqueous solution, potash alum (potassium aluminum solution, AlK(SO4)2 · 12H20) is added to the solution. While the alum bonds to the colorant, the dye is still soluble and remains suspended in solution.
5. An alkaline solution of potassium carbonate is slowly added, effectively neutralizing the acidic solution. During this step, the mixture begins to effloresce (foam) as the dye precipitates into a solid, insoluble pigment. To the right are three time-lapse videos of the efflorescence created when making the cochineal-based red lake (fig. 9), madder root-based red lake (fig. 10), and sappanwood-based red lake (fig.11).
6. The solution is then filtered, washed with deionized water, and left to dry (figs. 12-14. As mentioned above, some solutions were able to be filtered in less than an hour, while others took weeks. This was entirely dependent on the size of the pigment particle, as smaller particles took much longer to filter. Additionally, some recipes required less of the alkaline solution which leads to less precipitation of the pigment. In those cases, the dye was suspended in the solution leading to a longer filtration process.
FIGURE 9. Timelapse video showing efflorescence of the cochineal lake
FIGURE 10. Timelapse video showing the efflorescence of the madder lake
FIGURE 11. Timelapse video showing the efflorescence of the brazilwood

FIGURE 12. Preprogram interns, Lila Reid and Jonah Jablons, prepare the filters for the filtration process

FIGURE 13. Filtering cochineal lake

FIGURE 14. Postgraduate fellow, Rachel Childers (right), starting the filtration process with Lila Reid (left).
In the end, the workshop lasted over three days. Several recipes had to be repeated as the temperatures exceeded what was recommended in the recipes. This happened several times when making the cochineal pigment, the most difficult of the red lakes to create. Several recipes were followed in order to obtain the quintessential purple-red hue, however the pigment that formed during the precipitation was often a pale pink and lacked vibrancy (fig. 15, a-c). After several trials and errors, the recipe was made again, but this time the heat was turned as low as possible on the hot plate during the addition of the alkali. While this resulted in a slightly pinker hue (fig. 15, d), it was still not ideal. Finally, altering the recommended steps in the recipe one more time, the pigment was made from scratch again, but this time the ground cochineal wasn’t washed (skipping the first part of step 2), and the hot plate was kept off (though still slightly warm) when adding the alkali solution. These alterations proved to be successful, and a vibrant purple-pink hue was able to be made (fig. 15, e). The time lapse video above (fig.9) captures the efflorescence achieved during this final campaign to create a cochineal-based red lake.
FIGURES 15A-L, LEFT TO RIGHT. The viles are named A-L, left to right. Various shades of cochineal were able to be produces by varying the same recipe five different ways (fig. 15, A-F, pink vials on the left). Shades of madder are a much darker, red (fig. 15. G-L, dark red vials on the right). All steps of the recipe were followed, but the temperatures during step 5 were too high resulting in a pale pink (fig. 15 A-B) The filtering stage in step three was skipped in the hopes of retaining more pigment, but again the temperatures were too high during step 5 (fig. 15 C). The natural source for cochineal was swapped for those harvested in-lab from the Arizona cactus paddles, though the tone is still too pale due to high temperatures during step 5 (fig. 15 D). All steps were followed, including keeping the temperature down during step five resulting in a pinker hue (fig 15. E). The initial washing in step two was skipped in a successful attempt at retaining the purple hue associated with cochineal.
Creating the Paint
Each recipe yielded a different amount of pigment. In order to preserve some of the dry pigment, only half of each recipe was made into a paintable medium, while the remaining dry pigment was kept for future research purposes. The various shades of the remaining dry pigments created are shown below, in figure 16.
FIGURE 16. (Top) Shades produced by the cochineal pigments compared to (Below) shades produced by madder lake
In order to create the red lake paint medium, the pigments were first ground using a mortar and pestle, then poured onto a glass slab. A small well was made at the top of the mount of pigment where three to four drops of linseed oil could be added. Due to the incredibly fine quality of the lake pigments, they require very little oil to be saturated and made into a paint. The mixture is combined using a muheller along with several drops of turpentine to thin the viscous oil medium. Once that is complete, you’re left with a transparent red lake medium that can either be applied as a glaze or combined with a more opaque pigment to create a red-tinted pigment layer.
FURTHER RESEARCH
Creating red lake pigments using historic recipes was the first step in better understanding an artistic medium that has undergone little scientific analysis to investigate its molecular structure. In the hopes of broadening our understanding of the medium, the pigments made during the workshop will be used to compare with original paint samples gathered from the AIHA paintings taken during treatment. Ongoing scientific analysis has been performed here at the WACC using polarized light microscopy, handheld X-ray florescence spectroscopy, and Fourier transform infrared spectroscopy with the goal of identifying the type red lake used as well as gather more data on the overall artist palettes. More in-depth analysis will be done in the upcoming months through a collaboration with the Williams College Chemistry Department.
While research into the collection of Hudson Valley Patroon paintings is ongoing, the information gathered so far has provided valuable insight into a group of artists that have lacked art historical scholarship and comprehensive scientific evaluation.
While research into the collection of Hudson Valley Patroon paintings is ongoing, the information gathered so far has provided valuable insight into a group of artists that have lacked art historical scholarship and comprehensive scientific evaluation.
Acknowledgement
I would like to express my thanks to Jo Kirby for her many written contributions into the study of dyestuff and willingness to meet with myself and my colleague, Paintings Conservator Maggie Barkovic, to discuss the practical concerns surrounding the lake making workshop.
Additional thanks go to the WACCS two outstanding pre-program interns, Lila Reid and Jonah Jablons, for assisting me in making countless pigments through trial and error.
Photography Credit
REFERENCES
[1] Kirby, Joe. et al. ‘Natural Colorants for Dyeing and Lake Pigments: Practical Recipes and Their Historical Sources’, p. 1. Archetype Publications, 2014.
[2] Hartley, Robert M. “Three Rivers: Hudson, Mohawk, Schoharie. History from America’s Famous Valleys.” In Robert M. Hartley Collections of Indian Artifacts (Chiefly of the Mohawk Valley) and Miliary Uniform Buttons in the Margaret Reaney Memorial Library, St. Johnsville, NY. (digitized chapter) Originally published 1943, digitized 1998. http://threerivershms.com/hartleyindianmilitary
[4] Theobald, Mary Miley. “Putting the Red in Redcoats.” In CW Journal (blog), Summer 2012. https://research.colonialwilliamsburg.org/foundation/journal/summer12/dye.cfm
[5] Kirby, Joe. et al. ‘Natural Colorants for Dyeing and Lake Pigments: Practical Recipes and Their Historical Sources’, p. 13. Archetype Publications, 2014.
[6] Ibid., p. 14.
[7] Ibid., p. 14.
[8] Ibid., p. 91.
[9] Ibid., p. 100.
[10] Ibid., p. 102.